



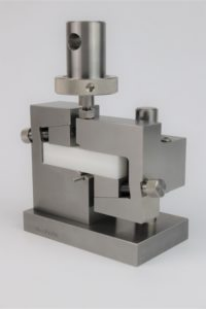
Shear test fixture (ASTM D5379) and composite material testing machine test process
2025-10-17 13:51:51In the field of composite material mechanical property testing, accurate acquisition of shear performance parameters is crucial to material design and structural safety assessment.Shear testing (according to ASTM D5379 standard) is an important method for determining the in-plane shear properties of composite materials, and the composite testing machine is the core equipment for completing this test.The following will introduce in detail the testing process using fixtures and composite material testing machines based on the ASTM D5379 standard, focusing on the operating points of the popular science testing machine.

1. Preparation for the test
Before starting the composite material testing machine for testing, adequate preparation is the basis for ensuring the accuracy and safety of the test, which mainly includes three aspects: test sample preparation, fixture installation and inspection, and testing machine status debugging.
(1) Test sample preparation
Composite samples were prepared in accordance with ASTM D5379 standard requirements.The sample needs to be of a specific size and shape, generally rectangular, with a thickness determined by the material properties (usually between 1-10mm).During the preparation process, it is necessary to ensure that the surface of the sample is smooth, without cracks, no damage, and the edges are neat to avoid affecting the test results due to sample defects.
(2) Installation and inspection of shear test fixtures
The shear test fixture is a key component to achieve shear loading, and its installation quality directly affects the test results.First, install the upper and lower parts of the clamp on the upper and lower chuck seats of the composite material testing machine respectively to ensure that the clamp and the chuck seat are firmly connected and there is no looseness.During the installation process, a level must be used to check the levelness of the fixture to ensure that the loading axis of the fixture coincides with the stress axis of the testing machine to avoid additional bending moments.Next, check the clamping surface of the clamp to ensure that the clamping surface is clean and free of debris. The clamping mechanism is flexible and reliable and can clamp the sample smoothly and evenly to prevent the sample from slipping or being damaged during the test.
When mounting the specimen, use your fingers to lift the small-diameter rod extending from the clamp below the notch at the lower end of the specimen so that the specimen is centered from left to right.The specimen is pushed onto the flat back side of the clamp, positioning it front and rear.The wedges are not intended for clamping; they can be adjusted with finger knobs to accommodate specimens of slightly different widths.Wedges of different thicknesses can be supplied to accommodate specimens outside of this small range of thickness variations.

(3) Composite material testing machine status debugging
Turn on the power of the composite material testing machine, start the control system software, and enter the test operation interface.Next, check whether the force sensor, displacement sensor and drive system of the testing machine are working properly.You can manually control the lifting and lowering of the chuck to observe whether the displacement display is accurate. At the same time, apply a smaller load to check whether the force value display is stable and accurate.

2.Core operating steps of composite material testing machine (key points)

The operation of the composite material testing machine is the core part of the testing process. Operators must strictly follow the standardized procedures to ensure that the test proceeds smoothly and accurate test data is obtained.
Test start-up and process monitoring
1.After the sample clamping is completed, the operator checks again whether the test parameter settings are correct and whether the sample clamping is firm and aligned.After confirmation, click "Start Test" in the testing machine control system software to officially start the test.
2.During the test, the testing machine will slowly apply load according to the preset test speed, and at the same time, the force value and displacement data will be collected in real time through the force sensor and displacement sensor, and the data will be transmitted to the control system software in real time and displayed on the operating interface in the form of a curve.Operators need to pay close attention to the changing trend of the curve and the operating status of the testing machine.
3.Observe the deformation of the sample during the loading process and pay attention to whether cracks, delamination and other damage phenomena occur.If an abnormality is found in the sample (such as a sudden drop in force value, abnormal increase in displacement, etc.), you should immediately click the "Emergency Stop" button to stop the test to avoid equipment damage or further damage to the sample.At the same time, the force value, displacement and other data when abnormal conditions occur are recorded for subsequent analysis.


End of test and data saving
1.When the test reaches the preset termination conditions (such as sample damage, reaching the preset maximum load or maximum displacement), the testing machine will automatically stop loading.
2.After the test, do not rush to remove the sample. First save the test data in the control system software.Select the appropriate data storage path to completely save the original data such as force value, displacement, time, etc. and the graphic data such as curves collected during the test.After the saving is completed, you can conduct a preliminary review of the data to check whether the data is complete and reasonable, and whether there are any abnormal data points.
3.After the data is saved, slowly loosen the clamp's fastening device through the manual control function and remove the sample from the clamp.When taking out the sample, be careful to avoid damaging the sample. At the same time, observe the damage form of the sample, record the damage location and damage type (such as shear damage, tensile damage, delamination damage, etc.) to provide reference for subsequent analysis of test results.

For practitioners engaged in the research and development, production and testing of composite materials, proficiency in such test operations is not only a reflection of professional ability, but also the responsibility to "check" material safety.From composite components in the aerospace field to composite components in new energy vehicles, their shear performance needs to be verified through such tests to ensure the structural safety and service life of the final product.